After my internship at the county, I decided to create a homelab/prod lab similar to how a standard enterprise might start its network architecture. This features a firewall, VLAN segmentations dividing servers and clients, Active Directory Domain Services, Wazuh security monitoring, and two client VMs acting like employee workstations. Since this prod lab is for demonstration purposes only, I’ll continuously update this site as I learn how modern operations can be built using free or open source softwares.
This EliteDesk features:
My home network is on an unmanaged switch, so I cannot create VLAN segmentation to divide different networks. pfSense allows me to create both VLANs and firewall rules between them. This limits the number of virtual machines I can add to this network, so five running concurrently maximise the use of one desktop.
| Subnet | Purpose |
|---|---|
192.168.1.0/24 | WAN / Home network |
10.10.10.1/24 | Servers |
10.10.20.1/24 | Clients |
| Name | Static/Dynamic | IP | DNS | vCPU | RAM | Storage |
|---|---|---|---|---|---|---|
| pfSense | Static | WAN: 192.168.1.101LAN: 10.10.0.1 | 192.168.1.1 | 1 | 2 GB | 32 GB |
| Windows Server 2025 | Static | 10.10.10.10 | 10.10.10.10 | 1 | 4 GB | 150 GB |
| Wazuh All-in-one Server | Static | 10.10.10.11 | 10.10.10.10 | 2 | 6 GB | 80 GB |
| Windows 11 client | Dynamic | 10.10.20.100 | 10.10.10.10 | 2 | 4 GB | 80 GB |
| Linux / Ubuntu client | Dynamic | 10.10.20.101 | 10.10.10.10 | 2 | 4 GB | 80 GB |
| Total | 8 | 20 GB | 422 GB |
Top-down topology
Throughout creating this environment numerous times, I practice learning how to set up firewall rules, Active Directory DS, VLANs, DHCP rules, and virtualization by using Proxmox as the central host. Because I was guided by both AI and other public resources like Reddit, I was misled numerous times, forcing me to reverse, make exceptions, and — although it sounds like giving up, it helps me cement my understanding — reset and reimage the hypervisor. I now have a guided walkthrough of how to create this exact environment and will continuously update it as I continue to grow my hardware and curiosity.
Hypervisor setup (Proxmox)
Cleaning / wiping the bootable drive
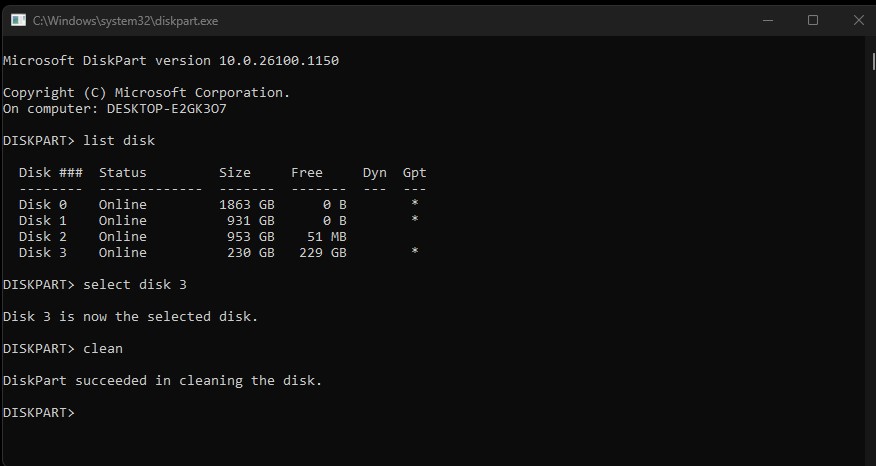
In Windows, I’ve had trouble wiping the USB with both File Explorer and Disk Management. The best application I’ve been using is diskpart. While the USB is plugged in, open CMD and execute:
diskpart        # opens diskpart
list disk       # find USB drive
select disk #   # select USB
clean           # wipes USB
Download the latest Rufus here.
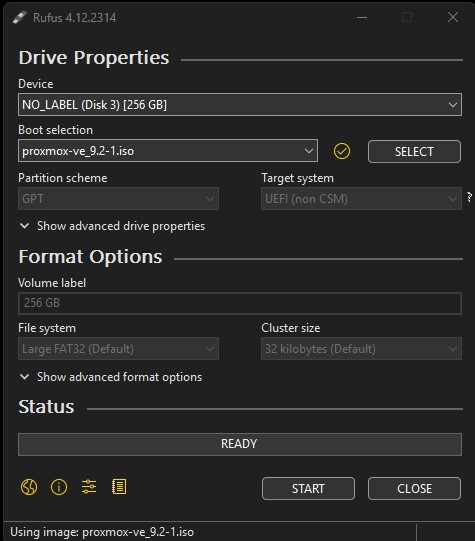
Download the latest Proxmox ISO here.
As a naming convention throughout this article, I will refer to the EliteDesk PC as a hypervisor. On a fresh USB stick, open Rufus and select both your USB and the Proxmox ISO. It’ll show an alert saying DD image writing mode will be used, ignore it. Click “Start” and unplug when completed.
Now in the hypervisor, plug in the bootable USB, monitor, and keyboard, and turn it on. Different computers have different keybinds to open the boot manager: F12, F11, F8, or Esc. At the boot manager, choose your USB drive and go through the installation process until you reach the networking settings.
Hostname:    homelab.internal
IP Address:  192.168.1.100    # static IP where you’ll reach your UI
Gateway:     192.168.1.1
DNS Server:  192.168.1.1
.internal.
After installation, open the UI on your desktop at 192.168.1.100:8006
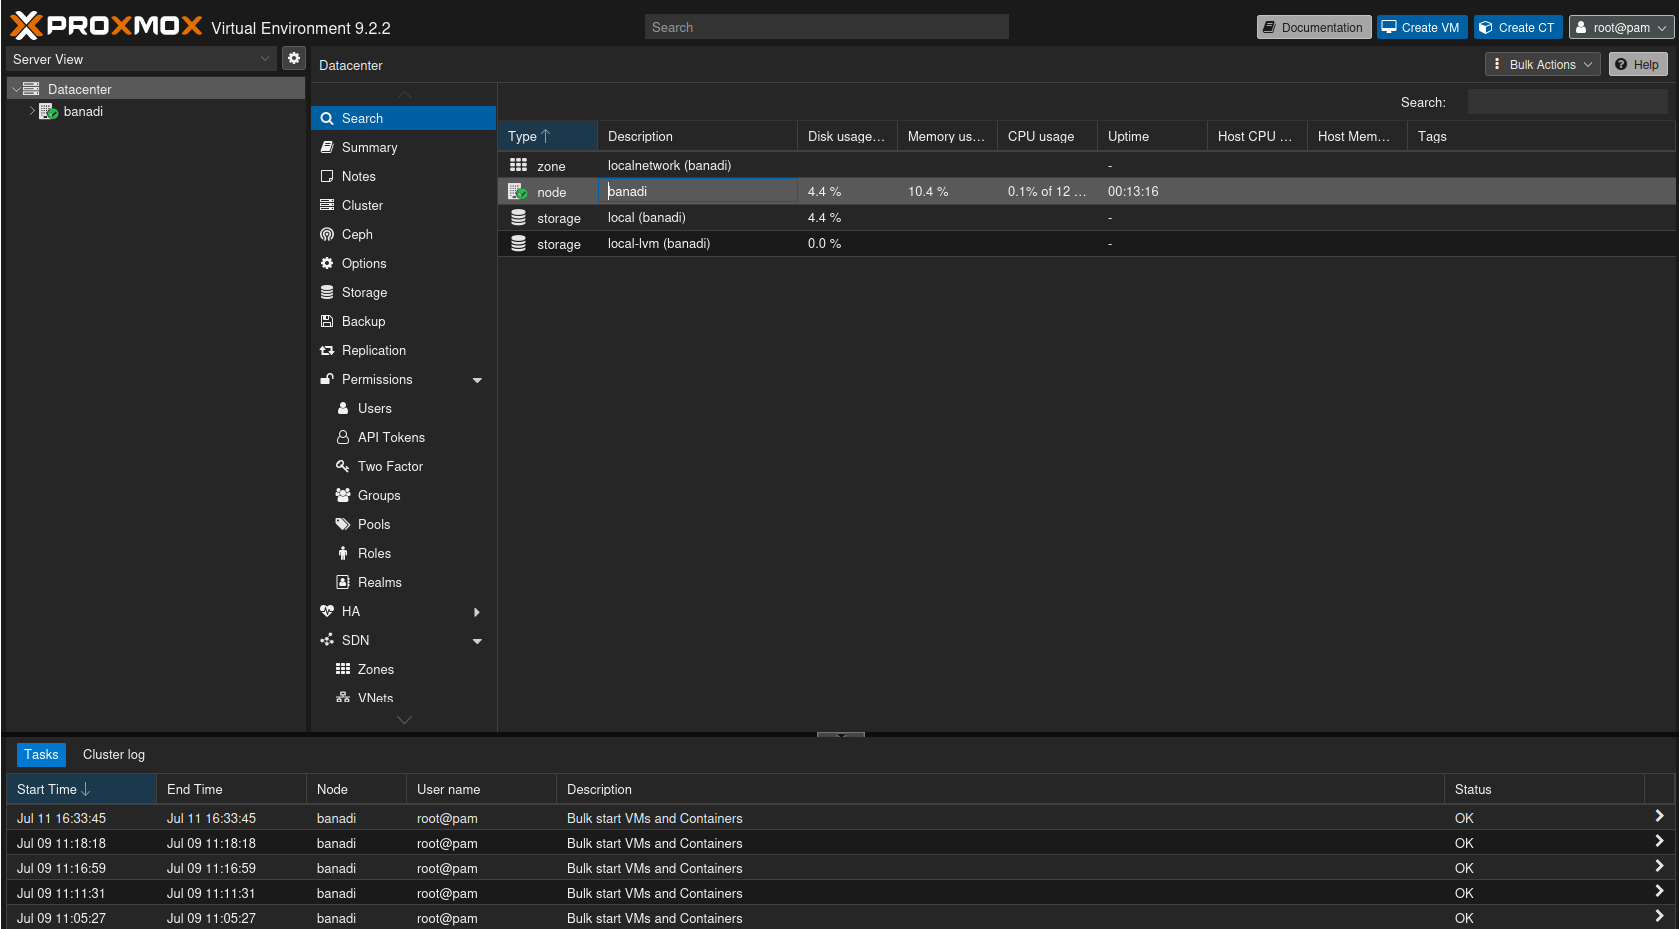
Now verify we updated everything by going to the shell and running:
apt update
apt full-upgrade -y
Creating VMs
Create the vmbr1 VLAN network interface:
Datacenter → Node → Network → Create → Linux Bridge
Name:        vmbr1
VLAN aware:  Checked
Start by importing all the ISOs of the machines that will be running in this homelab:
| Machine | Download |
|---|---|
| pfSense Community Edition | pfsense.org/download |
| Windows Server 2025 | microsoft.com — evaluate Windows Server 2025 |
| Ubuntu 26.04 LTS | ubuntu.com/download/server |
| Windows 11 | microsoft.com/software-download/windows11 |
| Ubuntu Desktop | ubuntu.com/download/desktop |
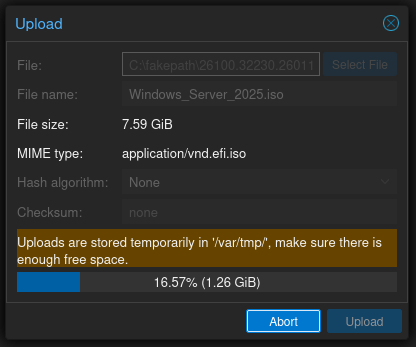
To import all of the ISO files to Proxmox, go to:
Datacenter → Node → local → ISO Images → Upload
Now on the top right, click Create VM:
| pfSense | WinServer2025 | WazuhServer | WinClient1 | LinuxClient1 | |
|---|---|---|---|---|---|
| General | VM ID: 101Name: pfSense |
VM ID: 102Name: WinServer2025 |
VM ID: 103Name: WazuhServer |
VM ID: 200Name: WinClient1 |
VM ID: 201Name: LinuxClient1 |
| OS | ISO: pfSense.iso |
ISO: Windows_Server_2025.isoType: Microsoft Windows |
ISO: Ubuntu_Server_26-04.isoType: Linux |
ISO: Windows_11.isoType: Microsoft Windows |
ISO: Ubuntu_Desktop.isoType: Linux |
| System | Defaults | EFI Storage: local-lvmTPM Storage: local-lvm |
Defaults | EFI Storage: local-lvmTPM Storage: local-lvm |
Defaults |
| Disks | 32 GB SSD Emulation: ✓ |
150 GB SSD Emulation: ✓ |
80 GB SSD Emulation: ✓ |
80 GB SSD Emulation: ✓ |
80 GB SSD Emulation: ✓ |
| CPU | Sockets: 1 Cores: 1 Type: host |
Sockets: 1 Cores: 1 Type: host |
Sockets: 2 Cores: 1 Type: host |
Sockets: 2 Cores: 1 Type: host |
Sockets: 2 Cores: 1 Type: host |
| Memory | 2048 |
4096 |
6144 |
4096 |
4096 |
| Network | Bridge: vmbr0 ** |
Bridge: vmbr1VLAN Tag: 10 |
Bridge: vmbr1VLAN Tag: 10 |
Bridge: vmbr1VLAN Tag: 20 |
Bridge: vmbr1VLAN Tag: 20 |
Hardware → Add → Network Device → Bridge: vmbr1 so that we have both interfaces.
Configuring pfSense
Start pfSense.
Please select the WAN interface: vtnet0
Please select the LAN interface: vtnet1
Proceed through the installation until you restart and reach the console.
Configuring the WAN IP address
Set Interface(s) IP address →
Enter the number of the interface you wish to configure: 1 (WAN) →
Configure IPv4 address WAN interface via DHCP? N →
Enter the new WAN IPv4 address: 192.168.1.101 →
Enter the new WAN IPv4 subnet bit count: 24 →
For a WAN, enter the new WAN IPv4 upstream gateway address: 192.168.1.1 →
Should this gateway be set as the default gateway? Y →
Configure IPv6 address WAN interface via DHCP6? N →
Enter the new WAN IPv6 address: <blank> →
Do you want to enable the DHCP server on WAN? N →
Do you want to revert to HTTP as the webConfigurator protocol? N
Now the pfSense firewall is on a static IP (192.168.1.101).
Configuring the LAN IP address
Set Interface(s) IP address →
Enter the number of the interface you wish to configure: 2 (LAN) →
Configure IPv4 address LAN interface via DHCP? N →
Enter the new LAN IPv4 address: 10.10.0.1 →
Enter the new LAN IPv4 subnet bit count: 24 →
For a LAN, press <ENTER> for none: Press enter →
Configure IPv6 address LAN interface via DHCP6? N →
Enter the new LAN IPv6 address: <blank> →
Do you want to enable the DHCP server on LAN? N →
Do you want to revert to HTTP as the webConfigurator protocol? N
Now the pfSense firewall is on a static IP (10.10.0.1).
Configuring VLANs
Press 1 to start configurations: Should VLANs be set up now? Y
| Prompt | VLAN 10 | VLAN 20 |
|---|---|---|
| Enter the parent interface name for the new VLAN | vtnet1 | vtnet1 |
| Enter the VLAN tag | 10 | 20 |
Enter the WAN interface name:         vtnet0
Enter the LAN interface name:         vtnet1
Enter the Optional 1 interface name:  vtnet1.10
Enter the Optional 2 interface name:  vtnet1.20
Do you want to proceed? Y
Now we need to set up the IP address range and DHCP. Press 2.
| Prompt | OPT1 | OPT2 |
|---|---|---|
| Enter the number of the interface you wish to configure | 3 (OPT1) | 4 (OPT2) |
| Configure IPv4 address via DHCP? | n | n |
| Enter the new IPv4 address | 10.10.10.1 | 10.10.20.1 |
| Enter the new IPv4 subnet bit count (1 to 32) | 24 | 24 |
| For a LAN, press <ENTER> for none | <ENTER> | <ENTER> |
| Configure IPv6 address via DHCP6? | n | n |
| Enter the new IPv6 address. Press <ENTER> for none | <ENTER> | <ENTER> |
| Do you want to enable the DHCP server on the interface? | y | y |
| Enter the start address of the IPv4 client address range | 10.10.10.100 | 10.10.20.100 |
| Enter the end address of the IPv4 client address range | 10.10.10.200 | 10.10.20.200 |
| Do you want to revert to HTTP as the webConfigurator protocol? | n | n |
Now we need to reset the admin account and password by pressing 3.
pfctl -d to disable the firewall. Now we can access the pfSense Web UI at 192.168.1.101:443.
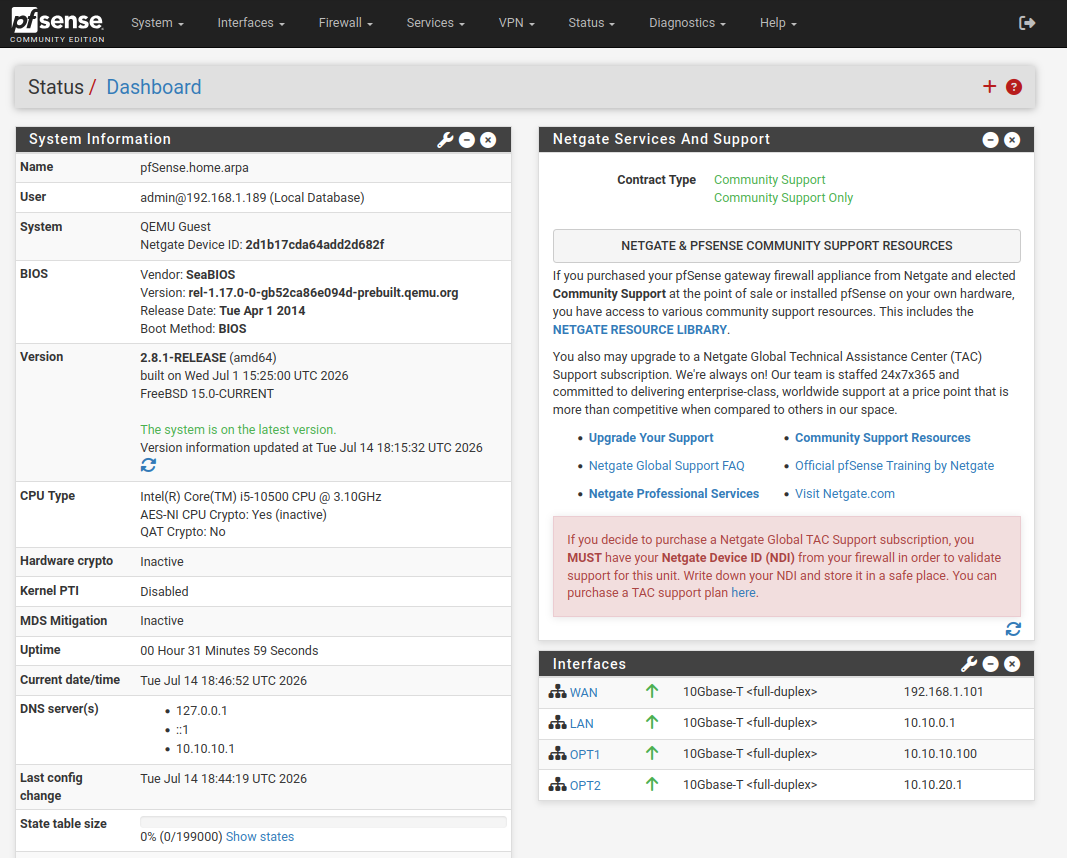
Interfaces → OPT1 and change the Description to SERVERS.
Interfaces → OPT2 and change the Description to CLIENTS.
Interfaces → WAN → uncheck “Block private networks and loopback” and “Block bogon networks.”
Firewall → Rules → WAN → add: pass TCP, source = 192.168.1.x (your PC) OR WAN subnets, dest = This Firewall (self), port 443.
Configuring firewall rules
Firewall → Aliases → Ports
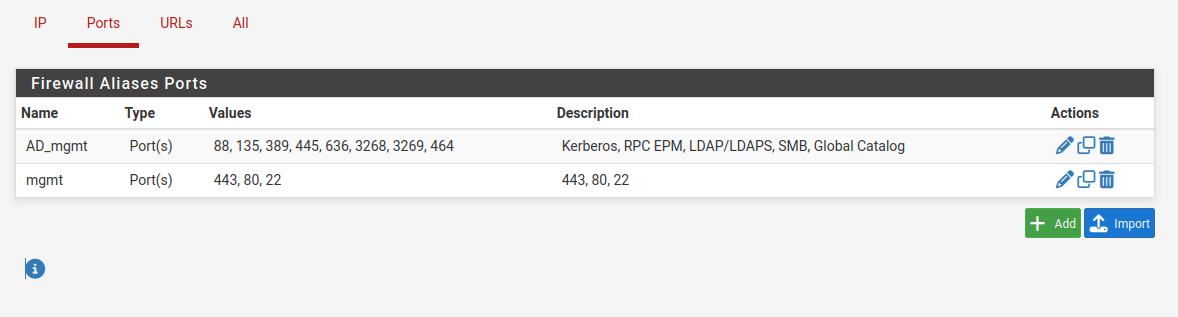
AD_mgmt (Kerberos, RPC EPM, LDAP/LDAPS, SMB, Global Catalog, kpasswd) and mgmt (443, 80, 22).464 (Kerberos kpasswd) in the AD_mgmt alias now. It’s easy to miss because the domain join in Stage 8 still succeeds without it — but the forced password change at a user’s first logon will silently fail.
Firewall → Rules
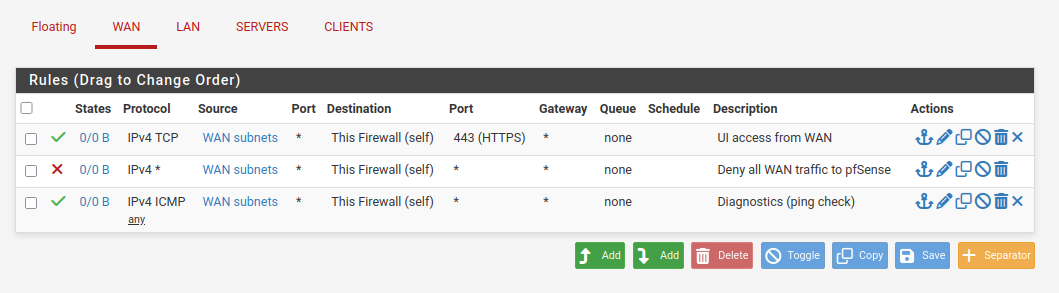
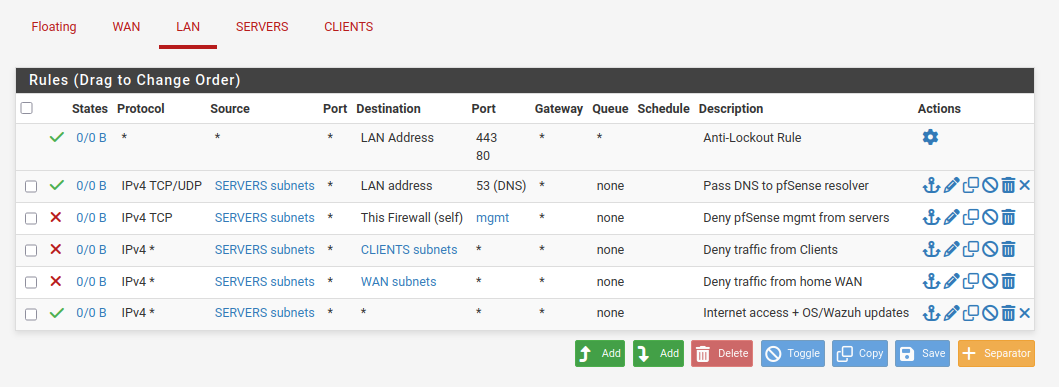
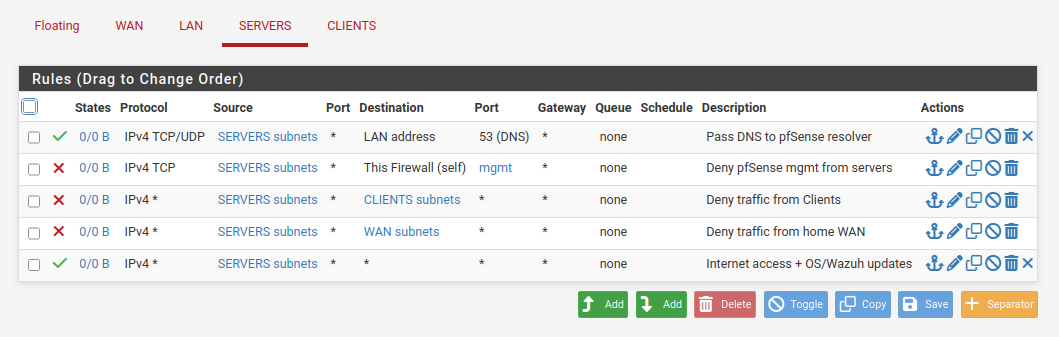
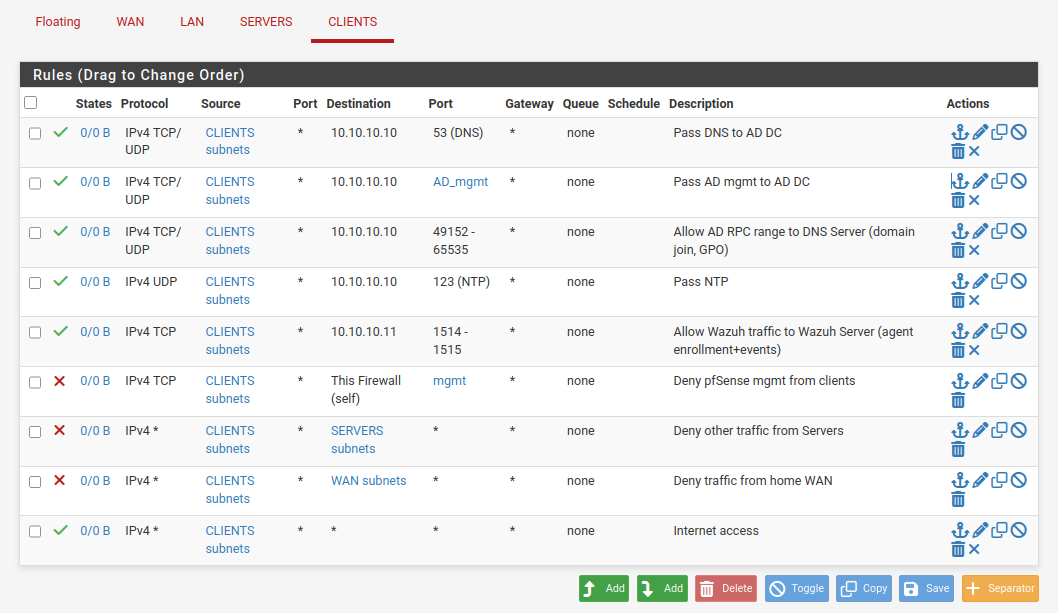
Also add 10.10.10.10 (AD DS) to the default DNS servers for the client subnet:
Services → DHCP Server → CLIENTS interface → DNS Servers field → set to 10.10.10.10 → Save → Apply Changes
Windows Server 2025, AD, and AD DS
Turn on the WinServer2025 VM and go through the installation steps. Choose the Desktop Experience.
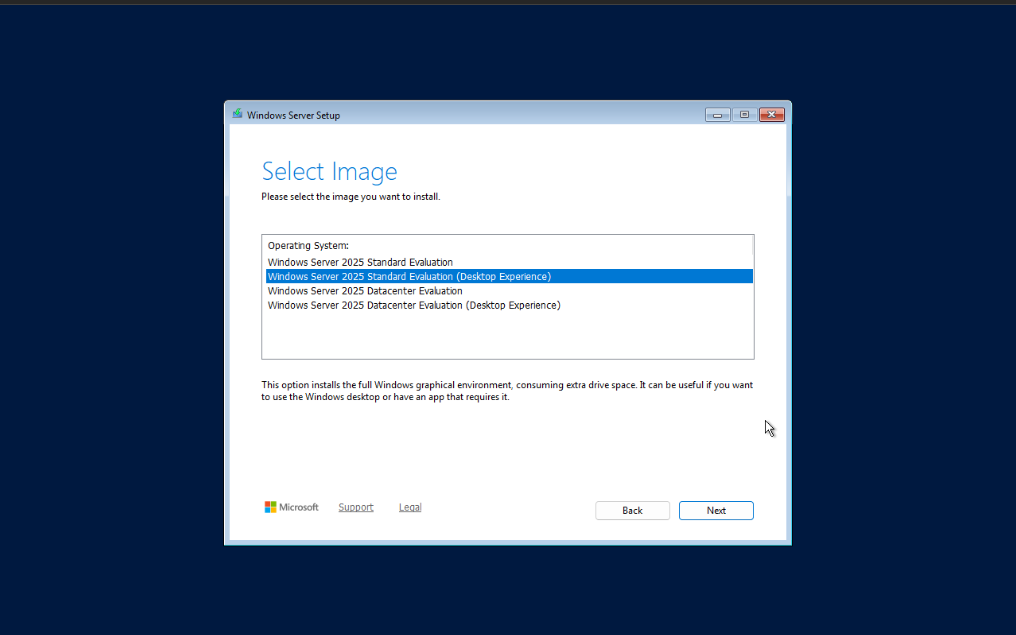
Once finished, we need to set a static IP and gateway.
Open Control Panel → Network and Sharing Center → Change adapter settings → Ethernet
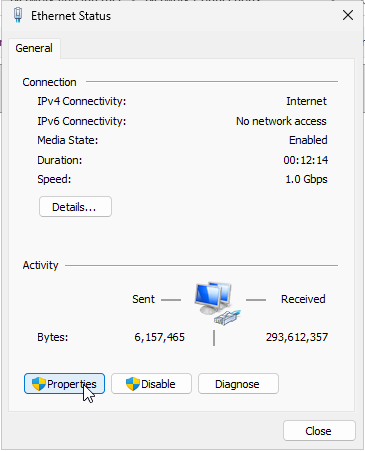
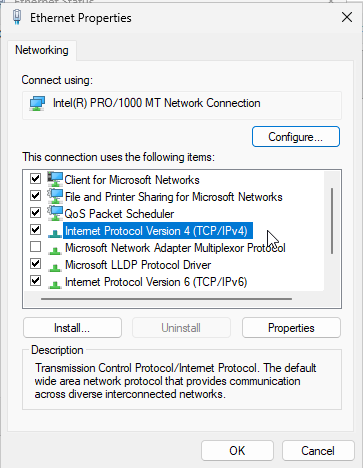
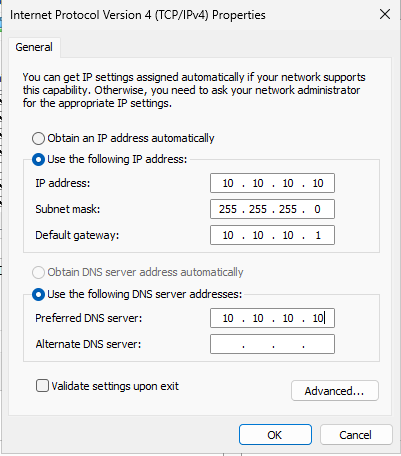
Now the server has a static IP of 10.10.10.10, gateway 10.10.10.1, and DNS 10.10.10.10 (itself).
And we can change the name of the computer by going to Server Manager → Local Server → Computer name
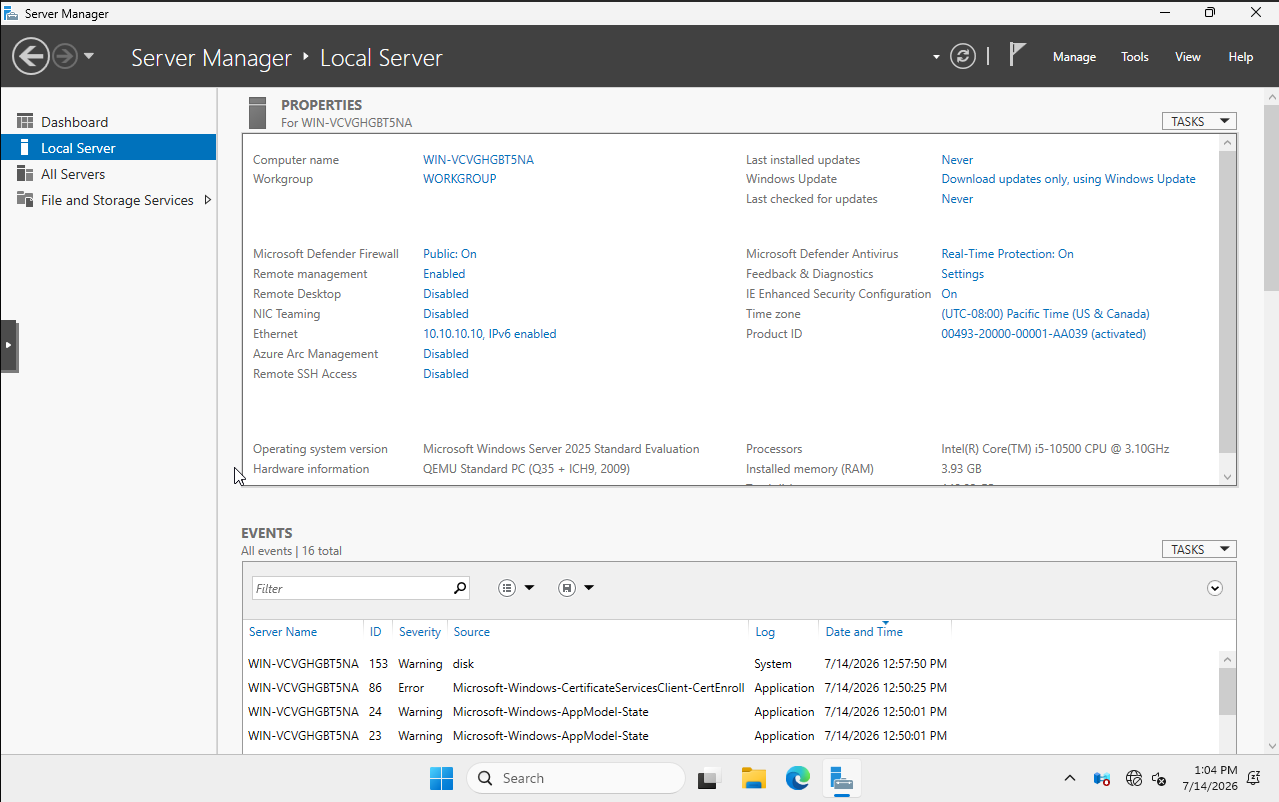
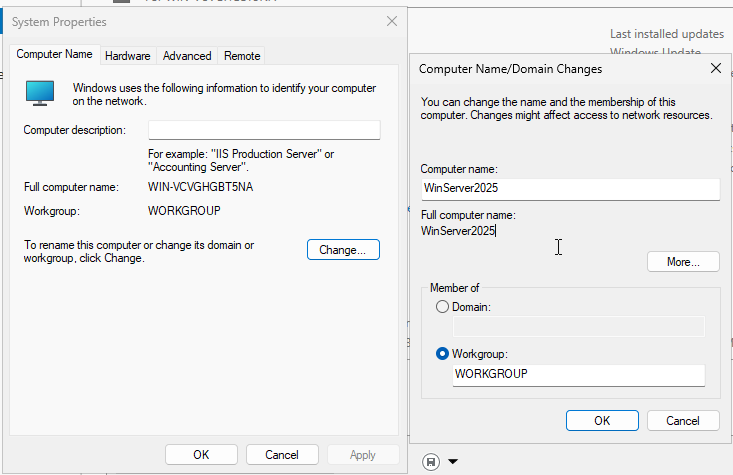
Now go to Change → Computer name: WinServer2025 — then restart to apply changes.
Now we need to create the Domain Controller.
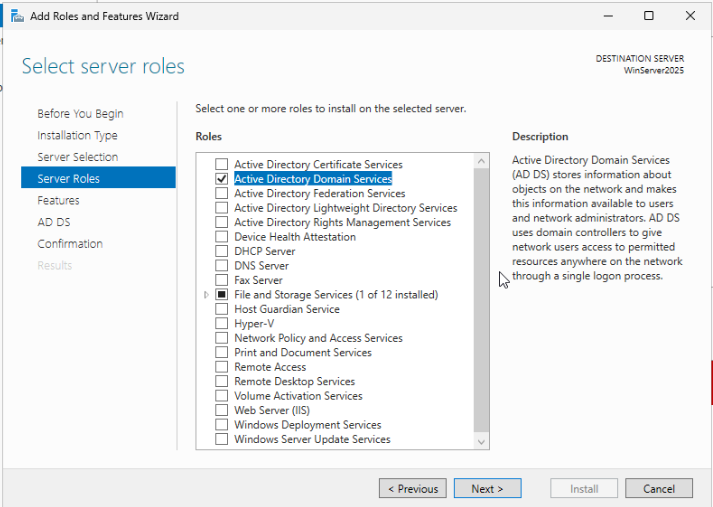
In Server Manager → Manage → Add Roles and Features → go until you reach Server Roles and check “Active Directory Domain Services”. Continue and Install.
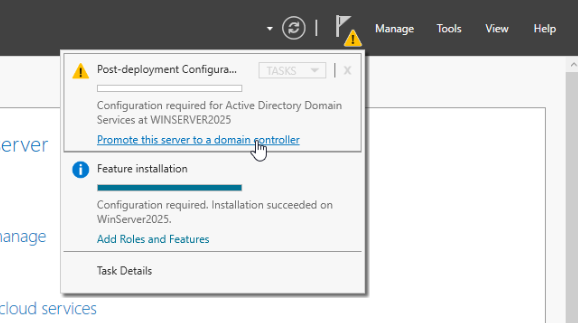
Now promote the server to a domain controller by clicking the flag at the top right in the Dashboard:
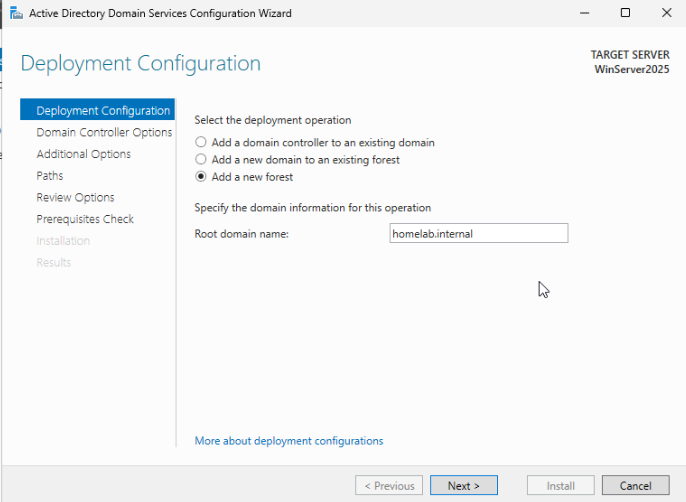
Select “Add a new forest” and use your homelab.internal domain name.
Navigate through the Wizard and hit Install, it’ll reboot after.
DNS Forwarder:
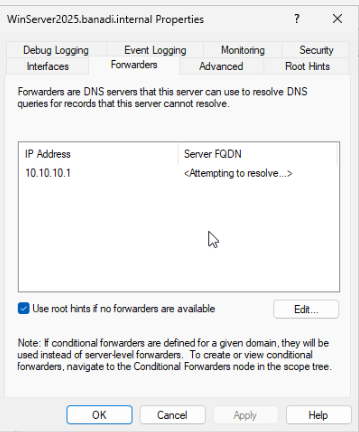
DNS Manager → server → Properties → Forwarders → add 10.10.10.1 (pfSense resolver). This gives the DC external resolution while it stays authoritative for the domain.
Wazuh all-in-one server
Start the WazuhServer VM and navigate through the installer until you reach Network configuration:
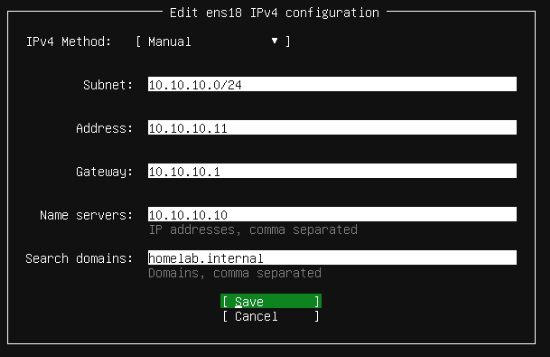
10.10.10.11 on the SERVERS subnet.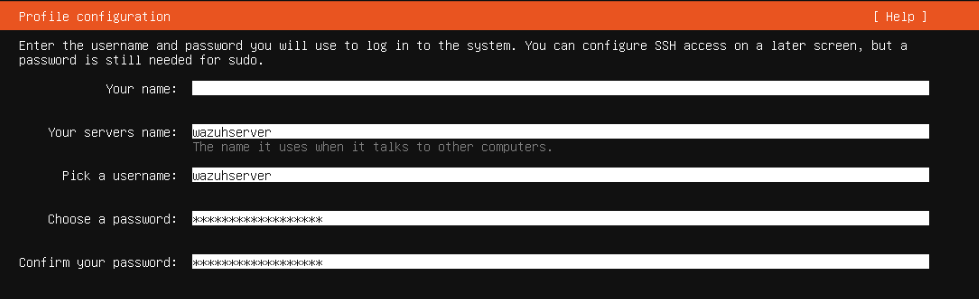
After reboot, remove installation media in Hardware, log in, and run:
sudo apt update && sudo apt full-upgrade -y
curl -sO https://packages.wazuh.com/4.14/wazuh-install.sh
sudo bash ./wazuh-install.sh -a
Credentials will be posted after installation, but you can also find them here in case you cleared it:
sudo tar -O -xvf wazuh-install-files.tar \
  wazuh-install-files/wazuh-passwords.txt
Now on the WinServer2025 VM, navigate to https://10.10.10.11 and change the password, which must fit the requirements:
- Between 8–64 characters
- Contain at least one upper and lowercase letter
- A number
- A symbol of either
.*+?-
Client VMs
6aWinClient1
Start the WinClient VM.
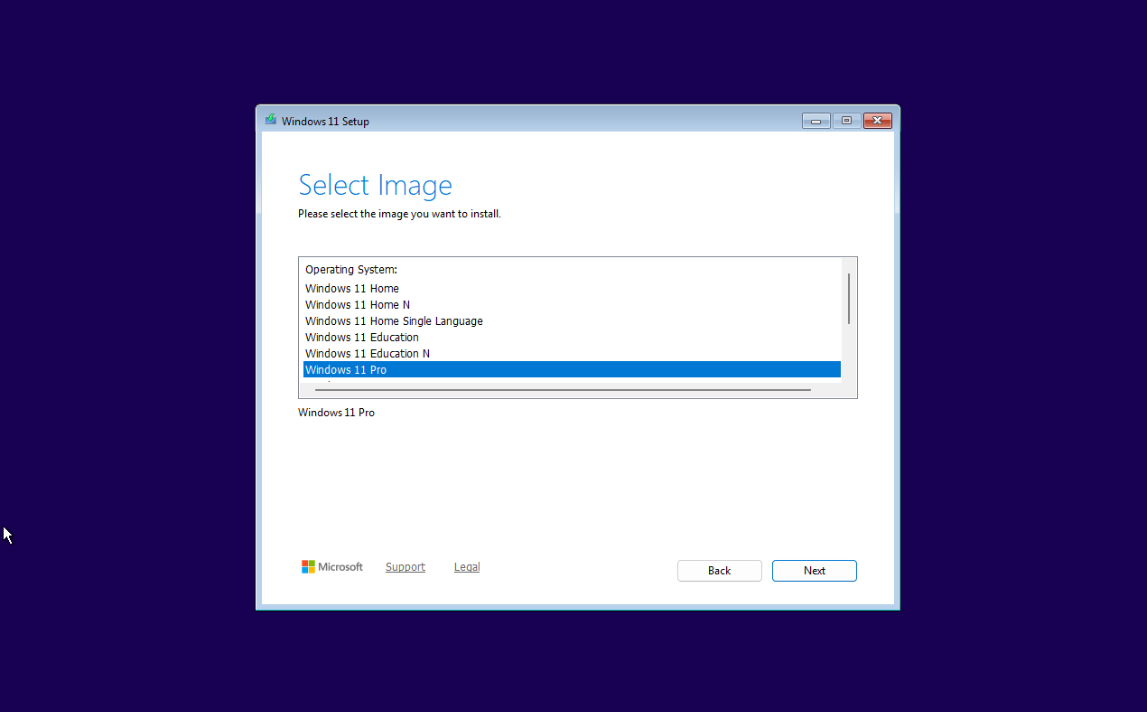
- When asked for product key, select “I don’t have a product key”.
- Select Windows 11 Pro.
- Name the device:
WinClient1 - Set up for work or school.
- When it asks to sign into Microsoft, hit
Shift + F10and runstart ms-cxh:localonly - Who’s going to use this PC?:
Employee 1· Password:employee1 - For all of the security questions, I put
employee1as the answer.
Verify that DNS is set:
Resolve-DNSName homelab.internal
6bLinuxClient1
Start LinuxClient1.
- Hostname:
LinuxClient1 - Domain name:
homelab.internal - Username:
employee2
After going through the wizard, reboot and then run:
sudo apt update && sudo apt full-upgrade -y
Wazuh agents
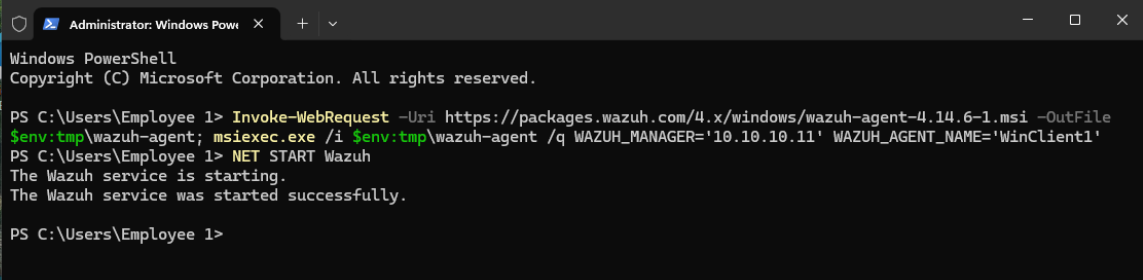
In the WinServer2025 VM, log into the Wazuh dashboard and go to + Deploy new agent.
For WinClient1 and WinServer2025:
- Select MSI 32/64 bits.
- Server address:
10.10.10.11 - Agent name:
WinClient1 or WinServer2025 - In the respective VM, run PowerShell as administrator and run the command.
- Run
NET START Wazuh
For LinuxClient1:
- Select DEB amd64.
- Server address:
10.10.10.11 - Agent name:
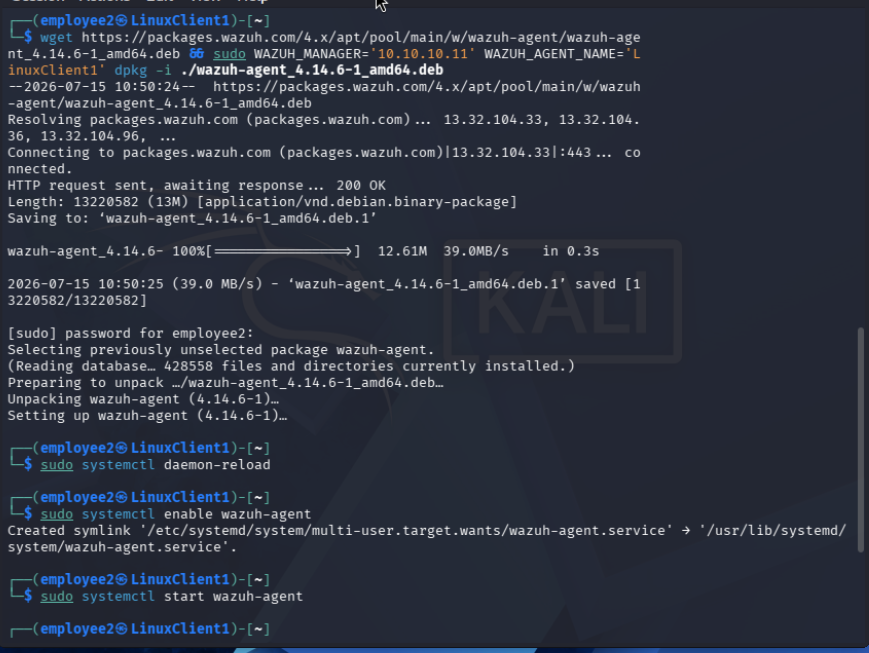
LinuxClient1 - Copy the command to the terminal.
- Run
sudo systemctl daemon-reload - Run
sudo systemctl enable wazuh-agent - Run
sudo systemctl start wazuh-agent
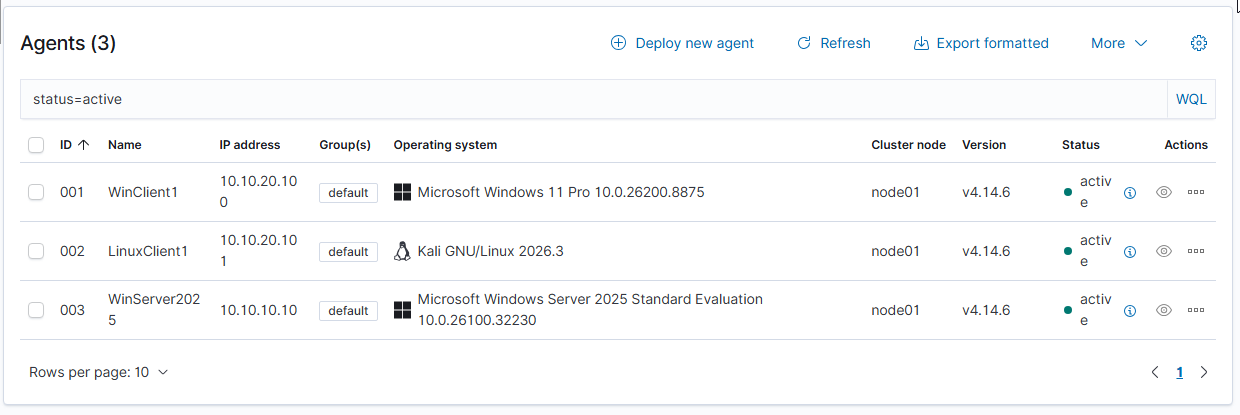
Now both devices should be visible in the Wazuh Agents dashboard.
Separating admin and user privileges
Up to this point both clients were running on local accounts with full administrative rights — which is exactly what you don’t want in a real environment. The goal here is least privilege: employees log in with domain accounts that can’t install software or change system settings, and administrative rights are granted through a single Active Directory group rather than handed out per machine. Both the Windows and the Linux client authenticate against the same domain, so one group membership controls elevation everywhere.
8aOrganizing the domain
On WinServer2025, open Server Manager → Tools → Active Directory Users and Computers.
Before creating any accounts, build an OU structure so accounts, computers, and groups stay separated — this is what Group Policy will later be scoped against.
- Right click
homelab.internal→New → Organizational Unit→ Prod Lab - Right click Prod Lab →
New → Organizational Unit→ Accounts, Computers, Groups - Right click Accounts →
New → Organizational Unit→ Users, Admins - Right click Computers →
New → Organizational Unit→ Workstations, Servers
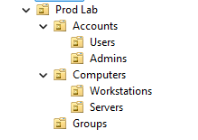
In the Groups OU, go to New → Group and create both security groups:
| Group name | Scope | Type | Purpose |
|---|---|---|---|
SG-Standard-Users | Global | Security | Everyday employee accounts — no elevation |
SG-IT-Admins | Global | Security | Grants local admin on domain-joined machines |
Now in the Users OU, go to New → User and create the two employee accounts:
- First name
Employee, last name1, user logon nameemployee1 - First name
Employee, last name2, user logon nameemployee2 - For both, set a password and check “User must change password at next logon”.
Select both users → right click → Add to a group → type SG-Standard-Users.
Then, in the main Users container (the built-in one, not the Prod Lab OU), double click Administrator → Member Of tab → Add → type SG-IT-Admins → Check Names → OK → Apply → OK.
8bWinClient1
Join the workstation to the domain:
Settings → System → About → Domain or workgroup → Change, then under Member of select Domain and enter homelab.internal.
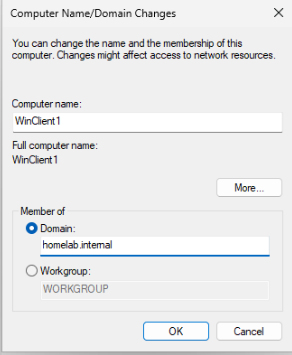
homelab.internal.Click OK, enter the Administrator credentials, and restart when prompted.
- After reboot, at the login screen click Other user.
- Sign in as
HOMELAB\Administratorwith the domain admin password. - Open
Settings → System → About. Under “Device specifications”, the Domain field should readhomelab.internal.
While signed in as HOMELAB\Administrator, right click Start → Computer Management → Local Users and Groups → Groups → double click Administrators.
The member list should only have:
AdministratorHOMELAB\Domain Admins
If employee1 is listed, remove it → Apply → OK.
To grant elevation through the group instead, stay in the Administrators properties window and click Add →
Locations → homelab.internal → OK → type SG-IT-Admins → Check Names → OK → Apply → OK.
Finally, disable the local Employee 1 account so the machine can only be used with the AD account.
In Computer Management go to Local Users and Groups → Users → Employee 1 Properties → check “Account is disabled” → Apply → OK.
8cLinuxClient1
Install the domain join and SSSD tooling:
sudo apt update
sudo apt install -y realmd sssd sssd-tools libnss-sss libpam-sss \
  libsss-sudo adcli samba-common-bin krb5-user packagekit
HOMELAB.INTERNAL in all caps — Kerberos realms are case sensitive.
Verify the realm, DNS, and domain discovery before joining:
cat /etc/krb5.conf | grep default_realm
nslookup homelab.internal
realm discover homelab.internal
sudo realm join -U Administrator homelab.internal
Now edit /etc/sssd/sssd.conf with sudo nano /etc/sssd/sssd.conf so SSSD handles sudo rules and creates home directories:
[sssd]
services = nss, pam, sudo

[domain/homelab.internal]
fallback_homedir = /home/%u
sudo_provider = ad
sudo systemctl restart sssd
sudo systemctl enable sssd
Enable automatic home directory creation:
sudo pam-auth-update --enable mkhomedir
Then configure sudo for the AD admins group — the Linux equivalent of adding SG-IT-Admins to local Administrators on Windows:
echo '%sg-it-admins ALL=(ALL:ALL) ALL' | sudo tee /etc/sudoers.d/domain-admins
sudo chmod 440 /etc/sudoers.d/domain-admins
sudo visudo -c -f /etc/sudoers.d/domain-admins
%sg-it-admins — SSSD normalizes AD group names to lowercase, so the casing used in Active Directory won’t match here.
Last, disable the local employee2 account so the workstation can only be used with the domain account:
sudo usermod -L employee2
sudo usermod -s /usr/sbin/nologin employee2
Now log out and back in with the username employee2 and the AD password.
This creates a home directory for employee2 and gives that account no admin privileges — matching the standard user on the Windows side.
Future implementations
- Send client telemetry to Wazuh server.
- Start Group Policy and configure permissions for clients.
- Utilize a UTM.
- Utilize an endpoint management platform to manage applications installed on clients.
- Utilize a managed switch to expand the homelab by adding more VMs through other devices like a RPi.